Advanced Workflow (AWF) Design Best Practices from Archer Scripts #1 Routing Node
– #1 Routing Node –
When designing Advanced Workflow (AWF), it’s very critical to have a routing node right after the Start node.
Why do we need a routing node?
If you have worked with AWF long enough (doesn’t take long at all), you’ll realize AWF errors are inevitable. Sometimes there are unexpected errors, sometimes the workflow just decides to get stuck, or your end-users might want you to “redirect” the flow to, say the “previous stage”. This is where a routing node comes to the rescue. If you don’t have a routing node carefully designed, when the error occurs and you need to restart the AWF or reenroll a record, it will start from the beginning if it’s a linear design. This means the whole process has to be restarted from the beginning, e.g., all your reviewers have to re-approve the already approved record.
What does the routing node do?
The routing node is an Evaluate Content node created right after the Start node. It will “evaluate” the state of the record and direct the flow to the appropriate place (node). If this is a new record, the flow will start from the beginning of the AWF, just like how you would normally design the AWF. On the other hand, if the routing node finds that the record should be directed to a node in the middle of the flow, it will “route” the flow directly to that specific node. This applies to a few scenarios below.
· AWF errored/stuck for whatever reason, you need to restart the workflow. Once restarted, the flow should be routed to the previous node it was on (e.g., in the middle of a review).
· You added new features to the AWF, and need to re-enroll all your records. Once bulk re-enrolled, all records should go back to where they were before the re-enrollment.
· Your business users request to have a record to be pushed to a previous stage.
How to implement the routing node?
So now, you are ready to create a routing node for all your AWF applications, but how do you configure the Evaluate Content node? We have done and have seen a great number of routing node implementations. You might default to your overall status as the routing criteria. For example, if your overall status is New, you want it to start from the beginning. If the overall status is pending Reviewer 1, you want it to go to the Reviewer 1 node. But is it the best way? The answer is most likely no. The reason is, soon enough, you will realize you are sharing different statuses on the same node, or when you update your overall status calculations, your routing node might be broken, or it might give you an unexpected result. It gets very complicated very soon and you will find yourself in a situation where you have to constantly redesign and troubleshoot. So what’s the simplest and safest way? To us, we found that using a static value to represent a node is the most reliable way.
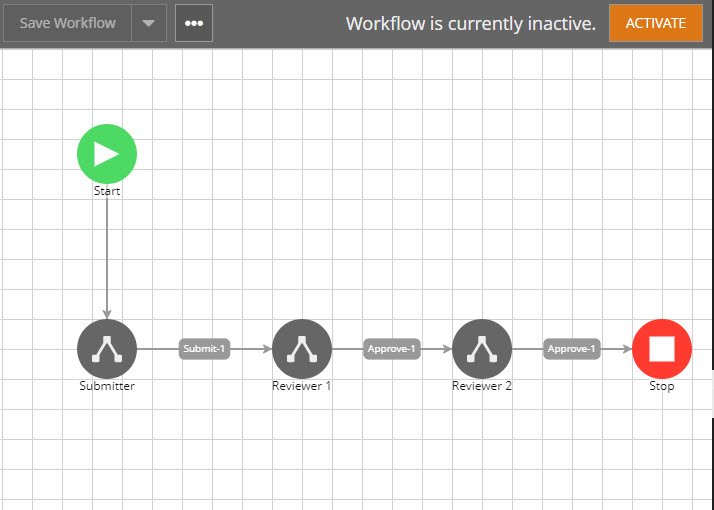
Here is how it works. See the simple demo flow below, it’s a linear workflow where it goes to Submitter right after the Start node. The submitter submits it to Reviewer 1, reviewer 1 approves it to push it to Reviewer 2, reviewer 2 approves it and it’s the end of the flow. Without the routing node, let’s say if the AWF errors at node Reviewer 2, if you restart the AWF, it would start from the beginning. Not good.
Now let’s add a routing node, so the AWF knows where to send it when it’s restarted / re-enrolled. See below.

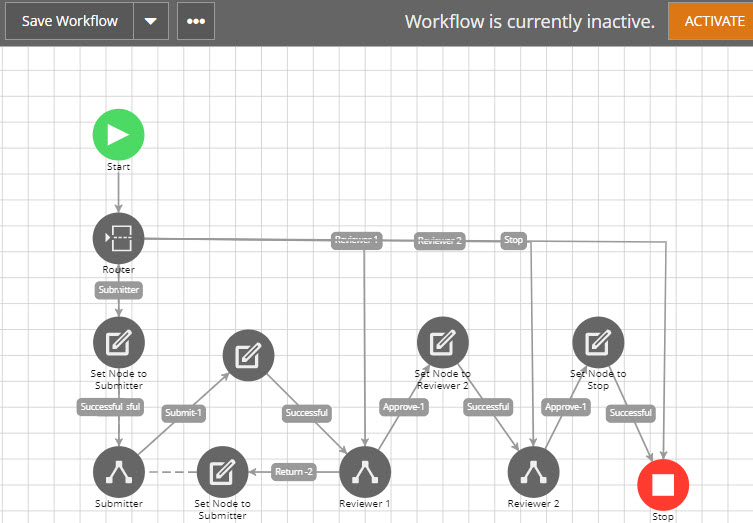
Now back to the topic of what to put in the router. We need to create a values list field with values that correspond to each of all your user nodes and wait for content nodes. Let’s call this field Node for simplicity. In this example, the Node values list has 4 values, Submitter, Reviewer 1, Reviewer 2, Stop. Now you can probably tell what I will show next. Yes, you just need to create an update content node right before each of your User Action and Wait for Content nodes. And configure the update content node to set the Node field to the value that represents the node it goes to next.
For example, before it goes to Submitter, an Update Content node sets the Node field value to “Submitter”. Right before it goes to the Reviewer 1 node, it sets the Node field value to “Reviewer 1” and so on. Then in your Router evaluation node, you just create simple rules such as if Node = Submitter, go to Submitter, if Node = Reviewer 1, go to Reviewer 1, and so on. Isn’t that easy and reliable? See the example below.
Now your router knows exactly where your flow sat when a restart is needed. Now even if your whole system is down, AWF services are completely wiped out, you can easily re-enroll all your records right back to where they were, regardless of what status they were in. This is all because of this simple, yet powerful static label approach.
The caveat – What might go wrong?
What might go wrong with this approach? Well, it’s not specific to this approach, it’s the famous looping transition issue that might apply to any design. It deserves its own topic. Here is a teaser though. See the scenario below, if your Reviewer 1 node has a “go back” feature, such as “Request for Additional Info” or “Return to Submitter”, you would need a transition to go back to the Submitter node. See below.
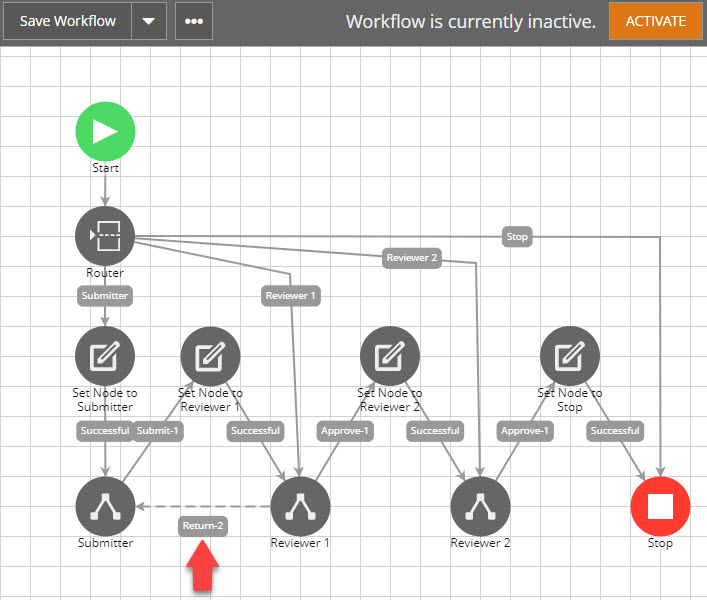
What’s wrong with this? If the flow goes from Submitter to Reviewer 1 as the normal flow, this is good.
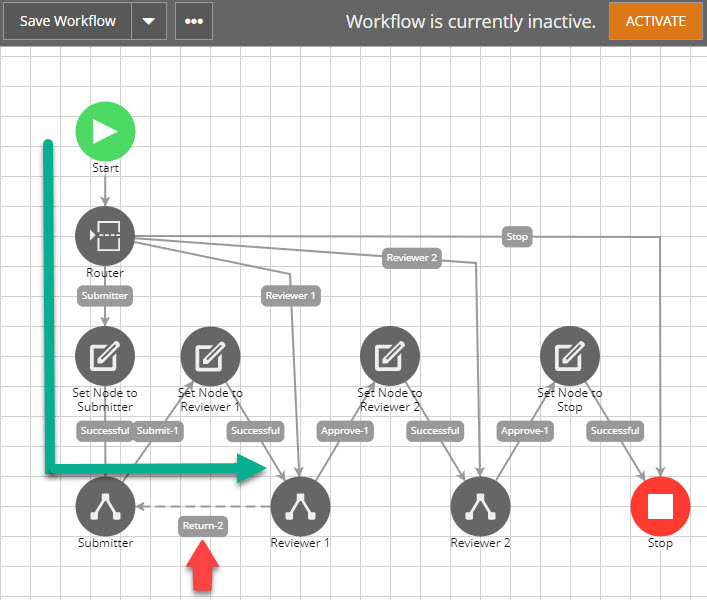
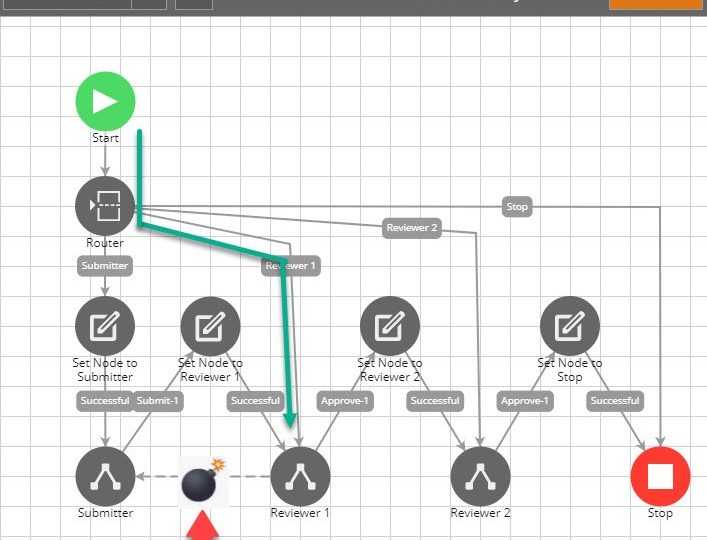
But what if the flow gets to Reviewer 1 through a re-enroll, in other words from the Reviewer 1 line out of the Router? See below.
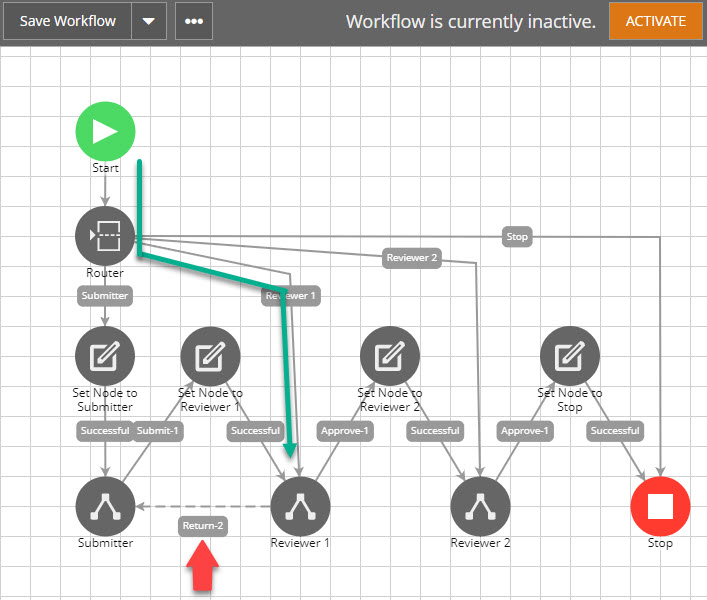
Now as you can see, the “Return” transition line is no longer a loop as it has never been to the Submitter node. Now the AWF will blow up. It either jumps to an unexpected node, or it simply errors out.
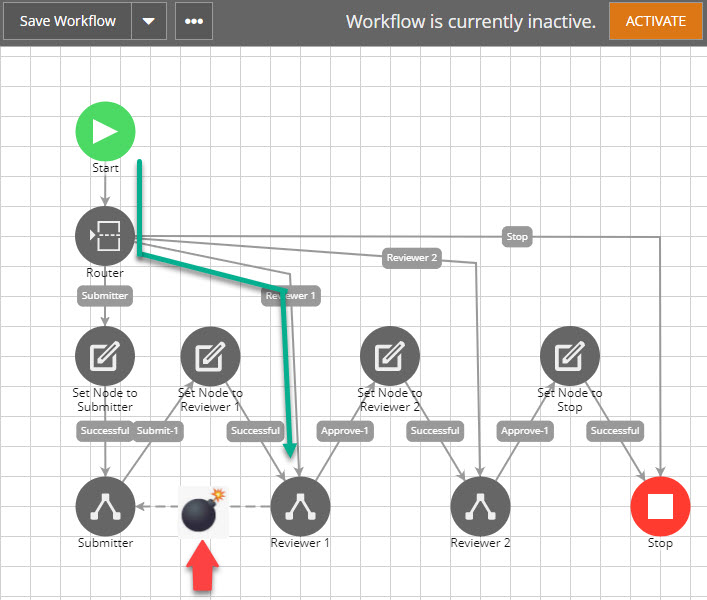
In the next topic, I will be writing about how to deal with this type of scenario.
